Getting Started with Scout
Adobe Scout is the next-generation profiler for AIR content running on both the desktop (Flash Player) and on mobile devices (Adobe AIR).
It gives you insight into the behavior of your content, best of all, it's really easy to get started using Scout—there are no complicated setup steps!
Scout gathers data about what's going on inside AIR. This helps you to understand how your ActionScript code interacts with the runtime, so you can really get to the root of your performance problems.
How does Adobe Scout work?
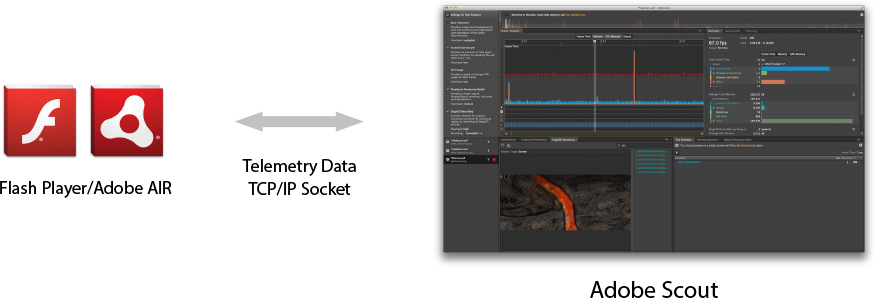
Scout relies on the telemetry feature that was introduced in Flash Player 11.4 and Adobe AIR 3.4. This feature gathers detailed information about the internals of the Flash runtime, as well as the ActionScript code that it executes, and sends it all to Scout. Scout presents this data clearly, concisely, and graphically, so that you can quickly diagnose performance problems with your content (see Figure 1).

Figure 1. Scout uses the telemetry feature of Flash Player and AIR.
Scout doesn't require a debugger version of Flash Player. This means that you can profile your content in a release environment using precisely the same SWF and webpage that your users will be running. Most importantly, Scout lets you profile your content at full speed, so that you can concentrate on actual performance problems that your users experience.
Install Scout
Download and install the latest version of Scout appropriate for your operating system:
- macOS
- Windows
Open the downloaded file and click on the installer package and follow the instructions to install the application.
Start the downloaded installer and follow the instructions to install the application.
Enabling Advanced telemetry on SWFs
You don't have to do anything special to start using Scout. Simply run your SWF while Scout is running, and you'll see a new session appear, with data coming in. However, SWFs will only provide a basic level of information to Scout by default. To access all the data that is available, such as information on your ActionScript code and detailed information about DisplayList rendering and Stage3D, you need to enable advanced telemetry on your SWF.
The reason this information isn't exposed by default is to prevent other people from using Scout to easily acquire these details about your content. Don't worry though; it's very easy to enable this, and unleash the full power that Scout has to offer.
There are a few different ways to enable advanced telemetry depending on your development environment.
- IntelliJ IDEA
- Visual Studio Code
- Moonshine IDE
- Animate
TODO
TODO
TODO
Enabling Detailed Telemetry data
To view and analyze your performance of applications with detailed telemetry data, do the following:
- In Animate, select File > Publish Settings to bring up the Publish Settings dialog.
- On the Publish Settings dialog, drill-down the Advanced options to select the Enable Detailed Telemetry option.
- You can choose to provide a password to secure access to the detailed telemetry data for your application. If you choose to enable password protection, you can access detailed telemetry data for your application, only after providing the password in Scout.
- Click OK.
Enabling Detailed Telemetry Data for Adobe AIR publishing for iOS devices
To enable Detailed Telemetry Data for Adobe AIR applications written for iOS devices, do the following.
- Ensure that you have the Enable Detailed Telemetry option selected on the Publish Settings dialog. For more information, see Enabling detailed telemetry data.
- On the Properties panel, click the button, beside the Target drop-down to bring up the AIR for iOS Settings dialog.
- On the AIR for iOS Settings dialog, switch to the Deployment tab and select the Enable Sampler option in the Telemetry Options section.
- Click OK.
Enabling Detailed Telemetry Data for Adobe AIR publishing for Android devices
To enable Detailed Telemetry Data for Adobe AIR applications written for Android devices, do the following.
- Ensure that you have the Enable Detailed Telemetry option selected on the Publish Settings dialog.
- On the Properties panel, click the button, beside the Target drop-down to bring up the AIR for Android Settings dialog.
- On the AIR for Android Settings dialog, switch to the Deployment tab and select the Enable Sampler option in the Telemetry Options section.
- On the Permissions tab, select the Internet option.
- Click OK.