Packaging Android App Bundles
This is specific for Google Play Publishing
Important: From August 2021, new apps are required to publish with the Android App Bundle on Google Play. New apps larger than 150 MB are now supported by either Play Feature Delivery or Play Asset Delivery.
An Android App Bundle (AAB) is a publishing format that includes all your app’s compiled code and resources, and defers APK generation and signing to Google Play.
Google Play uses your app bundle to generate and serve optimized APKs for each device configuration, so only the code and resources that are needed for a specific device are downloaded to run your app. You no longer have to build, sign, and manage multiple APKs to optimize support for different devices, and users get smaller, more-optimized downloads.
More information on Android App Bundles here.
Packaging
AIR supports creation of an App Bundle by creating an Android Studio project and using Gradle to build this. It requires an Android SDK to be installed. It also needs to have a JDK present and available via the JAVA_HOME environment variable.
The creation of an Android App Bundle involves a few steps and can take significantly longer than creating an APK file. We recommend that APK generation is still used during development and testing, and the AAB output can be used when packaging up an application for upload to the Play Store.
Installing Android SDK
You must download and install the Android SDK to your development machine. The easiest way to do this is to install Android Studio. Download.
Manual Install
It is possible to install just the Android SDK if you do not want to install Android Studio. You will need to:
- Download and extract the command line tools: https://developer.android.com/studio#command-tools
- Add the extracted folder to your path
- Run
sdkmanagerto list and install your Android SDK
Using sdkmanager
To list the available packages :
sdkmanager --list
Then to install the required sdk, you will want to install the following packages at least, build-tools;XX.X.X, platform-tools, platforms;android-XX and the emulator:
sdkmanager --install "build-tools;30.0.3"
                     "platform-tools"
                     "platforms;android-30"
                     "emulator"
Specify the Android SDK Path
You need to specify the path to your Android SDK in your AIR SDK configuration. There are several methods available to do this.
Using the AIR SDK Manager
You can use the AIR SDK Manager to set this configuration option. This is the simplest approach and provides a UI to edit your global adt.cfg directly.
Using adt.cfg
You can specify the Android SDK in the adt.cfg file located at [AIRSDK]/lib/adt.cfg and adding the following line:
AndroidPlatformSDK=/path/to/android/sdk
This will need to be updated in every AIR SDK you use.
Using an environment variable
You can set the path to the Android SDK by setting an environment variable named AIR_ANDROID_SDK_HOME that points to the Android SDK location.
This has the advantage of applying the setting to all installs of the AIR SDK.
Using platformsdk
If you use adt to package your application you can supply the path to the Android SDK via the -platformsdk option:
adt ... -platformsdk /path/to/android/sdk
Creating the AAB
Using adt
To package an AAB using adt simply change the target from apk to aab :
adt -package
    -target aab
    <signing options>
    output.aab
    <app descriptor and files>
    [-extdir <folder>]
    -platformsdk <path_to_android_sdk>
You can exclude the platformsdk option if you are using one of the other approaches above.
IDE's without AAB option
If you are using an IDE that currently cannot change the output target to aab you can force AIR to output an aab from the normal apk packaging process. This applies to most IDE's currently, including IntelliJ, Animate and FDT.
This is done by setting a configuration option in adt.cfg (located at [AIRSDK]/lib/adt.cfg):
CreateAndroidAppBundle=true
This will force the output to be in the AAB format, however your IDE may still output a file with the extension of apk. If this is the case you will need to rename the output from application.apk to application.aab.
Specifying Certificates
There is no change to how you specify the certificate used to sign the package whether it is an APK or AAB that you are creating. The method you are currently using for producing an APK is the same with AAB.
You can continue to use the same application certificate that you created in the past to sign your application, however you may want to see the notes on the upload certificate in the next section.
Signing and Certificates
In the past you were most likely using adt to generate a p12 certificate that you were using to sign your APK for Google Play.
Example certificate generation
adt -certificate    -cn COMPANYNAME
                    -o "COMPANY LTD"
                    -validityPeriod 20
                    -ou AU 2048-RSA
                    YOUR_CERTIFICATE.p12
                    PASSWORD
If you are creating a new application you can still use this approach and the follow the directions below to convert it for uploading to the Play Console.
Converting Existing Certificates
Play App Signing is required for publishing applications using an Android App Bundle.
Allow Google to protect the app signing key for your app and sign each release so Android devices can trust that updates are from you. This is a requirement to publish with the Android App Bundle.
To convert your existing certificate for use with Play App Signing you can use the tool provided by Google to convert and encrypt your certificate file for uploading.
Firstly identify the alias of your key in your certificate by using keytool:
keytool -v -list -keystore YOUR_CERTIFICATE.p12
keytool location
keytool is a key and certificate management utility.
You will find it in $JAVA_HOME/bin/keytool.
You will need to enter the password and then it should output something like the below:
Keystore type: JKS
Keystore provider: SUN

Your keystore contains 1 entry

Alias name: 1
Creation date: 03/06/2017
...
Take note of the Alias name: , in this case it is "1".
Next, start the process of signing up to "Play App Signing" in the Play console for your applilcation and use the Export and Upload a key from java keystore method.
- Log into the Play console and find the App Integrity page for your application:

- Select the "Export and upload a key from Java keystore" option:
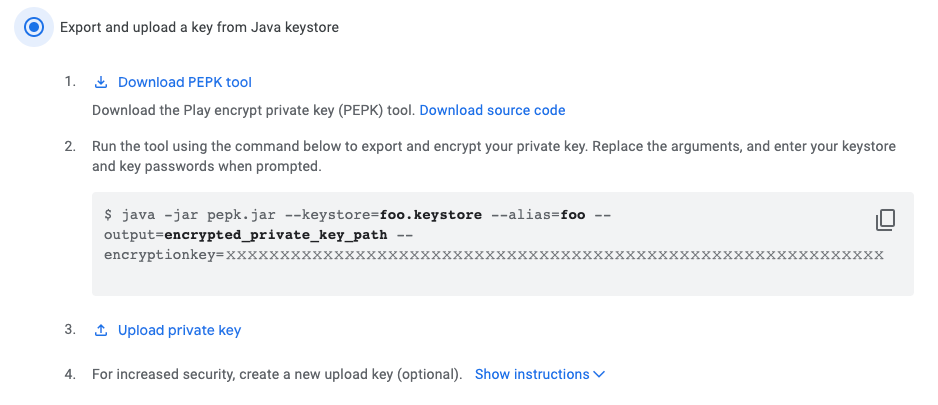
This will give you the option to download the PEPK tool (pepk.jar) and show you an encryption key to use in the command.
Use this as below, replacing the alias with the alias name you got above:
java -jar pepk.jar  --keystore=YOUR_CERTIFICATE.p12
                    --alias=1
                    --output=encrypted_certificate.zip
                    --encryptionkey=XXXXXXXXX
This will create a encrypted_certificate.zip file which you can upload to the Play console.
If you are attempting to convert a legacy 1024bit certificate, this process may fail. Have a look at the documentation on handling 1024bit certificates.
Upload Certificate
Using the upload certificate is optional but recommended by Google. You can continue to use your application certificate to sign your AAB for uploading to the Play console, and generally that will be the easiest approach.
The upload certificate is the certificate that you will use to sign your AAB for submission to the Play Store (and likely for debugging locally). Once you have completed the process of signing up for Play app signing, the App integrity section will show you details on the certificate that you uploaded as the "App signing key certificate" and also show you the "Upload key certificate" details.
-
If you don't add a separate upload certificate during the Play App Signing setup process then you should continue to use your existing certificate to sign your AAB for submission to the Play Store. You can confirm this by looking in App integrity section and comparing the signatures of the upload and application certificates.
-
If you choose to create a new upload certificate then during the Play App Signing setup process you should upload an additional certificate. It is important that you do this as part of the migrating process otherwise you will have to contact Google to upgrade the key (see below).
- Select "Upload your upload key certificate" in the Play App Signing page and select the
pemupload certificate file.
- Select "Upload your upload key certificate" in the Play App Signing page and select the
To create an upload certificate
- Create a RSA 2048 certificate using
adt(replace fields as required):
adt -certificate \
	-cn "common name" \
	-validityPeriod 20 \
	2048-RSA \
	upload_certificate.p12 \
	password
- Convert the
p12to apemfile:
keytool -export -rfc \
		-keystore upload_certificate.p12 \
		-alias 1 \
		-file upload_certificate.pem
- Upload the
upload_certificate.pemfile as your upload certificate.
What to do if you need to change your upload certificate
If you have already setup Play App Signing to change the upload key certificate go to the "App integrity" section for your application and follow the process to "Request key upgrade".
- Open the "App integrity" section for your application;
- Select "Request key upgrade";
- Select "I've lost the upload key which I use to sign each release";
- Follow the guide to contact support and provide a new certificate;
Testing
After you build your Android App Bundle, you should test how Google Play uses it to generate APKs and how those APKs behave when deployed to a device. There are two ways you should consider testing your app bundle: locally using the bundletool command line tool and through Google Play by uploading your bundle to the Play Console and using a test track. This section explains how to use bundletool to test your app bundle locally.
If you haven't already done so, install bundletool using brew (brew install bundletool) or download bundletool from the GitHub repository.
In all the examples below bundletool can be replaced with java -jar bundletool.jar if you are using the jar from the repository directly.
The bundletool generates an apks from your app bundle, this is a container called an APK set archive, which uses the apks file extension. To generate an APK set for all device configurations your app supports from your app bundle, use the bundletool build-apks command, as shown below.
bundletool build-apks --bundle=my_app.aab --output=my_app.apks
If you want to deploy to a device, you need to also include your app’s signing information and add the --connected-device option to specify the particular APK to build:
bundletool build-apks
    --bundle=my_app.aab
    --output=my_app.apks
    --connected-device
    --ks=YOUR_KEYSTORE.ks
    --ks-pass=pass:PASSWORD
    --ks-key-alias=ALIAS
(See the section below to create a keystore.ks)
Then to install the app to the connected device:
bundletool install-apks --apks=my_app.apks
More information on the bundletool can be found here
Creating a keystore.ks
You can create a keystore for use in the bundletool from your existing p12 file using the following command.
keytool -importkeystore
        -srckeystore YOUR_CERTIFICATE.p12
        -srcstoretype pkcs12
        -srcalias 1
        -destkeystore YOUR_KEYSTORE.ks
        -deststoretype jks
        -destalias ALIAS
You will need to set the srcalias to match the one from your certificate (see above for getting this information) and then set a new ALIAS which you will pass to the bundle tool.
This will ask for a password for the new keystore and for the password for your existing certificate.